FTP Integration - Imports
Configuration
From your dashboard, click on Configure Imports to begin.

File Information
Before imports can begin, settings around the import file need to be established.

- File Path: Enter a file path to establish where the import file will be located on the FTP server. This should be a full path, starting with a forward slash, and should not contain a file name. For example: /mongoose/imports
- File Name Prefix: Enter a file name prefix to establish the naming format of the import file. This prefix will be used to locate files within the path specified. If your import files will be generated with a timestamp in them, the prefix of the file should remain the same. For example, if an import file might be named "StudentData_2018_09_30", you would enter "StudentData" as the File Name Prefix.
- Files to Import: Select whether you would like the integration to import the most recent file in the path specified or all matching files found in the path with the desired prefix. If multiple files are selected, they will be imported as separate batches.
- File Delimiter: Select whether the file is comma separated or tab delimited.
- After Import: The integration can be set to move the imported file to a specific location on the FTP server (with a date appended to the filename) or delete the file when the import is complete.
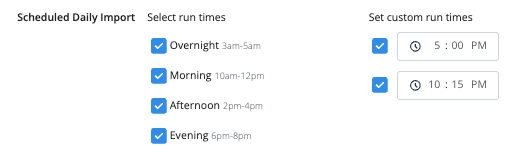
- Scheduled Daily Export: Imports can run up to 6 times per day.
- Notification Emails (optional): Enter in an email address (or multiple email addresses, separated by a comma) to generate a notification email every time an import occurs. The email will recap what occurred in terms of how many records were in the file, how many were successfully imported, and if there are errors, a file will be attached showing which records had an error along with the error message.
Note: There are no file size restrictions for our FTP integration, however, keep in mind that the more data in your file, the longer it will take to import.
Field Mapping
The Field Mapping section covers all potential fields that can be included in your data imports.

Standard Fields
Fields need to correspond to the column headers/fields in your import file. There are four Mongoose required fields: Contact ID, First Name, Last Name, and Mobile Number. All of these need to have a corresponding column in your import file.
Staff ID is an optional field that you can use to assign contacts to specific users. You can learn more about the functions tied to Staff ID here.
Opt-Out Settings
Optionally, you can choose to import texting preferences for each contact. Enter in the name of the column in your import file that corresponds to opt out status, then specify the value in the field that pertains to an opt-in and an opt-out. There is also an option to specify how empty values should be treated.
More information about opt out settings can be found here.
Note: If you import a contact record for the first time and you do not include a field containing opt out preferences, the contact will be opted-in. Going forward, the existing opt out preference on the Mongoose contact record will be preserved unless you decide to start importing this piece of information.
Additional Fields
Up to 25 additional custom fields can be included in your imports. Click the [ +Add Field] button to add a new custom field.

Under Mongoose Field, type in the name of the field as you'd like it to display on the contact record in Mongoose. Under File Column Header, type in the name of the field exactly as it displays in your import file. Next to each field, some additional field-level settings can be configured:
- Checking Required will ensure that the field must be included in every import (the field itself must be present, but it does not have to contain a value).
- Checking Mergeable will make the field available to be merged into a text message by users in the team.
- Checking Visible to User box will determine whether or not the data will be displayed for the contact in the conversation view.
Import Schedule and Options
As mentioned above, there are up to six daily import times you can choose to enable. Additionally, there is an option to manually trigger an import at any time if you do not want to wait until the next scheduled automatic import time. This can be found under FTP Integration > Imports and can be initiated by clicking [Run Import].

Note that the rules around which fields are allowed and required on manual imports are governed by the setup of fields within the FTP Integration's import settings (shown above in the Field Mapping section).
To continue to the next step of configuring the integration, click the following link: Exports